About Password Protected Galleries
Password Protected Galleries require clients to ‘Sign In’ to access their private galleries. 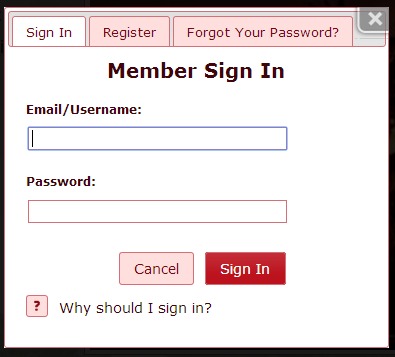
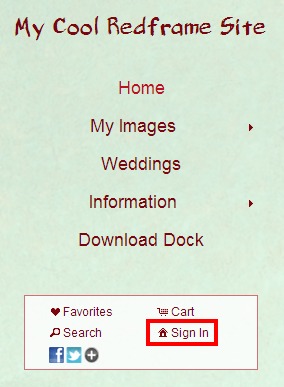
- Clients can access Password Protected Galleries by clicking the Sign In button in your Features Menu to pop-up the Sign in Box to enter the user and password for access to the Private Gallery
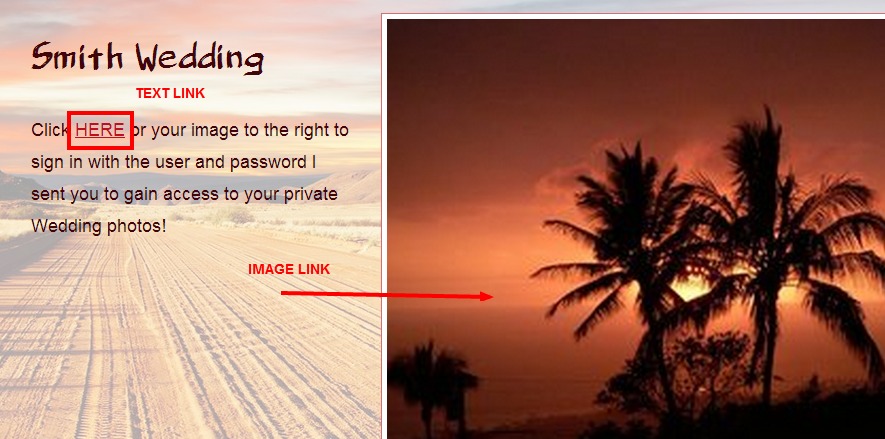
- Or, you can create an image and/or text link on a page to pop-up the Sign In box automatically when the text/image is clicked. You are essentially creating a Link to the Sign In area/box and the Sign In box will pop-up when the text/image is clicked. This is a good solution to bypass clients having to ‘find’ the Sign In button in your Features Menu
- If you intend to Password Protect Private Galleries, you will also want to make sure the Sign In feature is enabled for your website and appears (enabled) in your Features Menu if you intend to create password protected galleries for your Redframe site. Click here for information about using the Sign In feature.
- The galleries themselves do not have passwords, but are applied to a Customer Account (in Manage Your Customers) that has a username and password. Whether your client clicks the Sign In button in the features menu or you create a Text or Image Link on a page to automatically pop-up the Sign In Box, you will need to Create the Private Gallery and Assign it to a Customer Account in order for your customer to successfully Sign In to view the password protected private gallery Click here for information about the Customer Accounts area and Manage your Customers
To create a Private Gallery, in your Redframe admin/Site Editor
1. click Manage
2. click Manage Your Galleries
3. click Add a new gallery
4. enter the gallery name, then choose “Private”
5. click Create New Gallery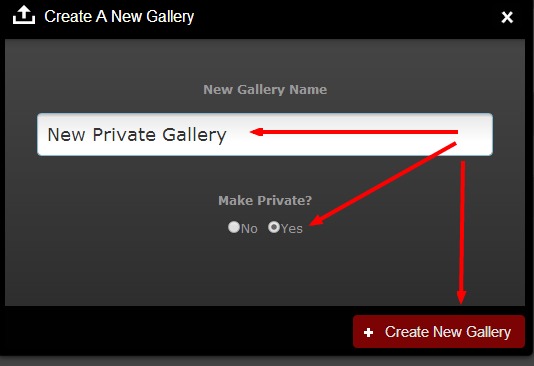
You will be asked to choose a Gallery Layout for your new private gallery. You can then upload images to your private gallery.
Now you will apply this private gallery to a Customer Account record if it is to be Password Protected.
1. click Manage
2. click Manage Customers
3. find or create the customer account to which you wish to apply the private gallery, click “Add private gallery or folder” next to the customer name
4. choose the gallery from the drop down list
5. click “Add Gallery”
*Note 1 – Private galleries have to be added to customers one at a time. However, if you have one customer who needs access to several different galleries, you can place the galleries into a private folder and then give that customer access to multiple galleries by assigning the folder to their customer account. Private Folders/Galleries function the same as Public Folders/Galleries. Click here and read ‘Organize your Galleries into Folders’
**Note 2 – Please be sure that Customer Accounts have unique user and passwords created. Duplicate passwords should not be used.
***Note 3 – Be sure NOT to add keywords to your private gallery images. If you do this it will be possible for anyone to use the search feature on your website and possibly pull up your private images.
Create a Text Link to pop-up the Sign In Box for access to a Private Gallery
Note: You will have already needed to create the private gallery and assigned to a Customer Account (see above) if you want to link a Sign In Box to text or an image on a Page.
- From the Redframe Site Editor – navigate to the page you want to create the link (example: Weddings)
- Click the blue button “Edit this Page” in the Top Menu then click “Edit Main Page” from the drop down graphic
- Type the text you want to use as the link in any text area within the page
- Highlight the text by using your left click button on your mouse
- After you have highlighted the text that will become the link, click the ‘link’ button with the closed chain icon above in the editor area
- In the Choose a Function drop down menu, select ‘Pop Up Customer Sign in Box’
- Click the Update button
- Click the ‘Submit Changes’ button in the lower right corner when the editing page screen appears again
Create an Image Link to pop-up the Sign In Box for access to a Private Gallery
Note: You will have already needed to create the private gallery and assigned to a Customer Account (see above) if you want to link a Sign In Box to a text or image.
- From the Redframe Site Editor – navigate to the page you want to create the link (example: Home)
- Click the blue button “Edit this Page” in the Top Menu then click “Edit Main Page” from the drop down graphic
- Click the image you want to use as the link (it will highlight) – (click here for information on how to add/insert images to a page.)
- Click the ‘link’ icon button
- In the Choose a Function drop down menu, select ‘Pop Up Customer Sign in Box’
- Click the Update button
- Click the blue ’Submit Changes’ button in the lower right corner when the editing page screen appears again